The goal of this procedure is to replace self-signed External PSC certificates with a Microsoft CA signed certificate.
Helpful blog posts and articles:
http://www.enterprisedaddy.com/2017/01/configure-psc-ha-in-vsphere-6-5-part-1-configuring-certificates/
https://kb.vmware.com/s/article/2112014
https://kb.vmware.com/s/article/2112009
https://kb.vmware.com/s/article/2136693
Environment:
2 External PSC servers (v6.5) behind a load balancer
PSC1 – psc1.myitblog.local
PSC2 – psc2.myitblog.local
VIP – vpsc.myitblog.local
First step is to create a MS Certificate Authority vSphere 6.x Template for SSL certificate creation:
- Logon to the CA server and start certtmpl.msc
- In Template display, right-click Web Server and Duplicate Template
- Select Windows 2008 R2 for backward compatibility
- General Tab > display name field, enter vSphere 6.x
- Extensions tab > Application Polices and click Edit, select Server Authentication and click Remove
- Extension tab > Select Key Usage and click Edit, select the Signature is proof of origin (nonrepudiation) option, leave the rest as default.
- Click Subject Name tab > ensure Supply in the request option is selected
- Save Template
Generate CSR and Private key:
-
-
- Logon to psc1.myitblog.local using SSH
- Run the command shell followed by chsh -s “/bin/bash” root
- Then start WinSCP and open a SCP session to psc1.myitblog.local
- In root directory create a folder called “certs”
- Open a notepad and paste the following code:
[ req ]
distinguished_name = req_distinguished_name
encrypt_key = no
prompt = no
string_mask = nombstr
req_extensions = v3_req
[ v3_req ]
basicConstraints = CA:false
keyUsage = nonRepudiation, digitalSignature, keyEncipherment
subjectAltName = DNS:vpsc.myitblog.local, DNS:psc1.myitblog.local, DNS:psc1.myitblog.local
[ req_distinguished_name ]
countryName = UK
stateOrProvinceName = State
localityName = London
0.organizationName = myitblog.co.uk
organizationalUnitName = IT
commonName = vpsc.myitblog.local
- Alter subjetAltName and commonName to suit your environment
- Save file as psc_ha_csr_cfg.cfg
- Upload it to the cert directory created earlier
- Run the following command to generate CSR and Private key:
openssl req -new -nodes -out /certs/psc-ha-vip.csr -newkey rsa:2048 -keyout /certs/psc-ha-vip.key -config /certs/psc_ha_csr_cfg.cfg
- Copy CSR to desktop
-
Generate certificate:
- Navigate to your Microsoft CA certificate authority Web interface then click Request a certificate
- Click Submit a certificate request by using a base-64-encoded CMC or PKCS #10 file, or submit a renewal request by using a base-64-encoded PKCS #7 file
- Paste CSR and select vSphere 6.x as the Certificate Template
- Submit and download Base 64 encoded certificate, rename as psc-ha-vip.cer
- Export relevant Intermediate and Root certificates from the CA server in Base 64 format as well
- Rename Intermediate certificate as CustomInterCA1.cer and the Root CA certificate as CustomRootCA.cer
Replace self-signed certs with CA signed certs:
-
-
- Upload all three certificates to the certs folder on psc1.myitblog.local
- Run the following commands to create chain certificates:
cat /certs/psc-ha-vip.cer >> /certs/psc-ha-vip-chain.crt
cat /certs/CustomInterCA1.cer >> /certs/psc-ha-vip-chain.crt
cat /certs/CustomRootCA.cer >> /certs/psc-ha-vip-chain.crt
then
cat /certs/CustomInterCA1.cer >> /certs/cachain.crt
cat /certs/CustomRootCA.cer >>; /certs/cachain.crt
- If there is more than one intermediate certificate modify the commands above as:
cat /certs/psc-ha-vip.cer >> /certs/psc-ha-vip-chain.crt
cat /certs/CustomInterCA1.cer >> /certs/psc-ha-vip-chain.crt
cat /certs/CustomInterCA2.cer >> /certs/psc-ha-vip-chain.crt
cat /certs/CustomRootCA.cer >> /certs/psc-ha-vip-chain.crt
then
cat /certs/CustomInterCA1.cer >> /certs/cachain.crt
cat /certs/CustomInterCA2.cer >> /certs/cachain.crt
cat /certs/CustomRootCA.cer >> /certs/cachain.crt
- Run the command
/usr/lib/vmware-vmca/bin/certificate-manager
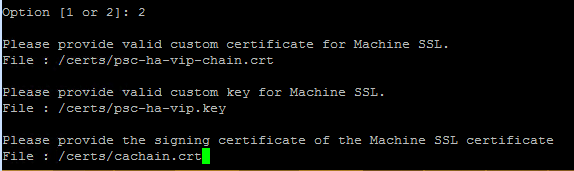
- Select option 1, use the default administrator@vsphere.local credentials
- Then select option 2 and provide the paths for the Machine SSL certificate and key as well as the CA chain certificate

- Hit enter to start the certificate replacement process
- Logon to psc2.myitblog.local using SSH
- Run the command shell followed by chsh -s “/bin/bash” root
- Then start WinSCP and open a SCP session to psc2.myitblog.local
- In root directory create a folder called “certs”
- Copy psc-ha-vip-chain.crt, psc-ha-vip.key, cachain.crt located in psc1.myitblog.local certs folder to psc2.myitblog.local certs folder
- Repeat steps 3-6
-
Fix VAMI certificate issue:
Due to a bug in the appliance, VAMI does not display the new certificate after changing vCenter Server Appliance 6.x certificates.
Hence the following links produce a certificate error:
https://psc1.myitblog.local:5480
https://psc2.myitblog.local:5480
To fix the issue:
- Logon to psc1.myitblog.local using SSH
- Run the command shell
- Then run the following command to copy CA cert to the appliance folder:
cp /certs/psc-ha-vip-chain.crt /etc/applmgmt/appliance/ca.crt
- Open /opt/vmware/etc/lighttpd/lighttpd.conf with vi and add the line the following line:
ssl.ca-file="/etc/applmgmt/appliance/ca.crt"
- Then run following command to restart VAMI:
/etc/init.d/vami-lighttp restart
This completes the CA certificate installation process, the next step would be to configure the load balancer.
Pingback: Replace ESX host certificates with CA signed wildcard certificate using PowerShell! - myitblog